
Last Updated on October 28, 2023 by Timothy Byron Smith
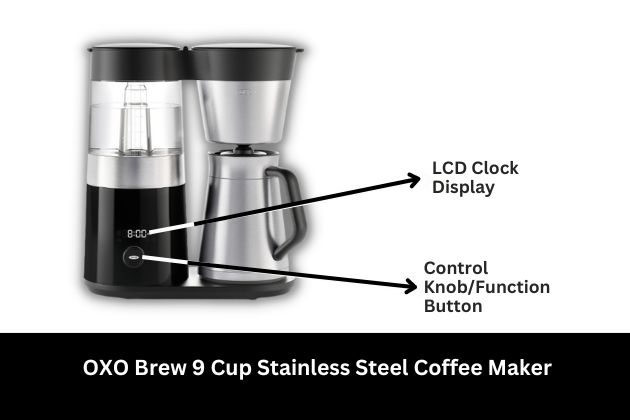
The OXO Coffee Maker is a beloved kitchen appliance that has won the hearts of coffee enthusiasts worldwide. With its sleek design and user-friendly features, it’s no wonder many households have chosen it as their go-to coffee brewing companion. One of the features that can make your coffee-making experience even more convenient is the clock setting.
This stylish coffee maker has a clock that you can use to schedule brewing times as well so that your coffee is ready when you need it.
Read More: How to Set Clock On Smeg Coffee Maker
Before we dive into setting the clock on your OXO Coffee Maker, let’s make sure you have everything you need. Ensure that your coffee maker is properly plugged in and powered on.
This simple step is essential to access the clock setting mode and enjoy the benefits it offers.
Accessing the Clock Setting On OXO Coffee Maker
Setting the clock on your OXO Coffee Maker is a straightforward process, but you’ll need to access the clock setting mode first.
Typically, this involves pressing specific buttons or using intuitive controls on the coffee maker. Check your OXO model’s user manual for precise instructions on how to do this.
Setting the Time On the OXO Coffee Maker
Once you’re in the clock setting mode, it’s time to set the time. Here’s a step-by-step guide:
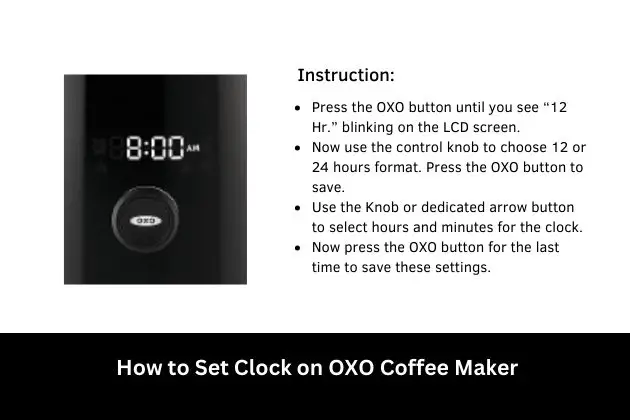
- Press the OXO Button: In most OXO Coffee Makers, there is a dedicated “functions” button. Press it until you see “12 Hr” blinking to begin setting time on OXO coffee makers.
- Choose a 12-hour or 24-hour format: Use the arrow button or rotating knob to choose your desired time format and press the “functions” button once again.
- Adjust the Hours: After pressing the “function” button, you’ll likely see the clock blinking on the display. Use the designated buttons or control knob to adjust the hours to the correct time. Pay attention to AM and PM indications if your coffee maker uses them.
- Set the Minutes: Once the hours are set, the minutes will start blinking. Similar to adjusting the hours, use the controls to set the minutes accurately.
- Confirm Your Settings: After setting the hours and minutes, look for the “functions” button or any dedicated button that may be labeled “Set” or “OK.” Press this button to confirm your time settings.
Read More: How To Set Clock On Cuisinart Coffee Maker
Confirming the Time On Your OXO Coffee Maker
To ensure that you’ve successfully set the time on your OXO Coffee Maker, take a moment to double-check the clock display. The correct time should now be displayed, indicating that you’ve successfully set the clock.
Some models may have a clock icon or indicator to confirm that the time has been set.
Troubleshooting
Setting the clock on your OXO Coffee Maker is usually a smooth process, but if you encounter any issues, here are some common problems and solutions:
- The Clock Isn’t Responding: If the clock isn’t responding when you press the designated buttons, ensure that the coffee maker is properly plugged in and turned on. If the issue persists, consult the user manual for model-specific troubleshooting tips.
- Incorrect Time Display: If the time displayed is incorrect, repeat the steps to set the time accurately. Double-check that you’ve adjusted both hours and minutes correctly.
- Power Outages: If your OXO Coffee Maker loses power due to an outage, you may need to reset the clock. Follow the steps outlined earlier to reset the time.
Additional Clock Features for OXO Coffee Maker
Depending on your OXO Coffee Maker model, there may be additional features related to the clock. These could include programmable brewing times, auto-start functions, or even reminders for regular maintenance.
Consult your user manual to explore these advanced features and make the most of your coffee maker.
Maintenance and Care
To ensure your OXO Coffee Maker’s clock functions smoothly and maintains its appearance, follow these maintenance tips:
- Regular Cleaning: Clean the exterior of your coffee maker with a damp cloth to remove any dust or coffee stains. Be cautious not to let water seep into the internal components.
- Descale When Necessary: If your coffee maker has a descaling function, use it as recommended in the user manual to prevent mineral buildup.
- Replace Filters: If your coffee maker uses filters, replace them according to the manufacturer’s instructions.
- Storage: If you plan to store your coffee maker for an extended period, unplug it, and store it in a cool, dry place.
Final Thoughts
Now you know, how to set clock on OXO coffee maker, this will surely enhance your coffee brewing experience. By following the steps outlined in this guide and consulting your user manual for model-specific details, you can enjoy precision and convenience with every cup of coffee.
With your clock properly set, you’ll have one less thing to worry about in the morning, allowing you to savor the aroma and flavor of your freshly brewed coffee to the fullest. As you embark on your journey to master your OXO Coffee Maker’s clock-setting process, remember that practice makes perfect.
Don’t hesitate to explore other features your coffee maker offers, such as programmable brewing times, to tailor your coffee-making experience to your preferences. Enjoy the convenience of a well-set clock, and may your mornings be filled with delicious coffee and a dash of punctuality.
