Last Updated on November 23, 2023 by Timothy Byron Smith
If you’re like me, starting your day with a fresh cup of coffee from your trusty Keurig is essential. But have you ever encountered the frustrating situation when your Keurig refuses to turn on after descaling? I’ve been there, and I’m here to help you navigate through this issue. This comprehensive guide is a result of hours of dedication, drawing from both my personal experiences and the wisdom of fellow Keurig users. So, let’s get started!
Why Your Keurig Won’t Turn On After Descaling
Before we delve into the solutions, it’s important to understand why your Keurig might be acting up. There are several possible culprits:
1. Power Cord Troubles
Solution: Ensure the power cord is firmly plugged into both your Keurig and the wall outlet. If in doubt, try another outlet to rule out any power source issues.
2. Thermal Fuse Problems
Solution: Keurig machines are equipped with a thermal fuse as a safety feature. If this fuse blows, your Keurig won’t turn on. This typically occurs if you descale your Keurig too frequently or too aggressively. To resolve this, you’ll need to replace the thermal fuse. Keep in mind that this is a delicate operation, so seeking assistance from a repair technician might be your best bet.
3. Leftover Descaling Solution Residue
Solution: Sometimes, descaling solution residue can stubbornly linger within your Keurig, causing issues. The remedy is quite simple – run a few cycles of plain water through your Keurig to flush out any remnants.
4. Internal Component Failures
Solution: In rare cases, your Keurig may not power on due to internal component failures, such as a faulty switch or a damaged circuit board. If all other potential causes have been ruled out, your Keurig may require professional repair or replacement.
Additional Tips for Troubleshooting
In the event that the above solutions don’t work, here are some additional troubleshooting steps to consider:
- Unplug your Keurig and wait for approximately 30 minutes. Sometimes, this can reset the machine and resolve the issue.
- Try descaling your Keurig once more. It might effectively remove any lingering descaling solution residue.
- If all else fails, don’t hesitate to contact Keurig’s customer support for further assistance.
How to Disassemble Keurig K-Supreme
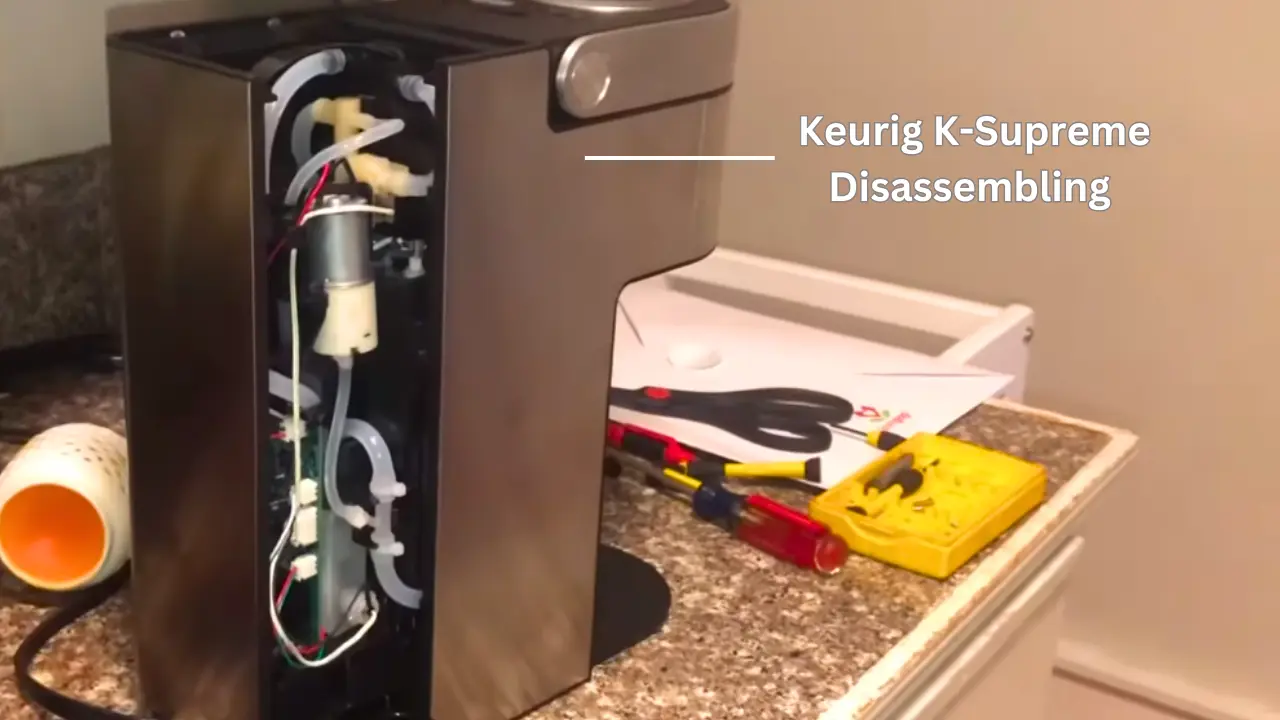
To disassemble your Keurig K-Supreme, please follow these steps after ensuring your machine is unplugged:
Tools Needed:
- Phillips screwdriver
- T10 Torx screwdriver
- Pry tool
- Spudger
Disassembling Steps:
- Remove the water reservoir from the back of the machine.
- Slide out and remove the drip tray under the brew head.
- Take out the five screws: two under the water reservoir at the back, two on the sides near the front, and one at the bottom near the back.
- Carefully pry off the side panels after the screws are removed, avoiding damage to the holding clips.
- Remove the top panel by unscrewing the two screws and lifting it away from the machine.
- Unscrew the two screws securing the front panel and pry off the clips to release it.
- Disconnect the three electrical connectors: two at the front near the brew head and one at the back near the power cord.
- Lift off the brew head assembly after removing the two screws holding it in place.
- Locate and remove the thermal fuse, usually on the bottom of the heating element, by desoldering the wires.
- Replace the thermal fuse with a new one of the same size and rating.
- Reassemble the machine in the reverse order of the disassembly steps.
How to Disassemble Keurig K-Supreme Plus
If you’re feeling adventurous and want to attempt a DIY repair, here’s a step-by-step guide on disassembling your Keurig K-Supreme Plus:
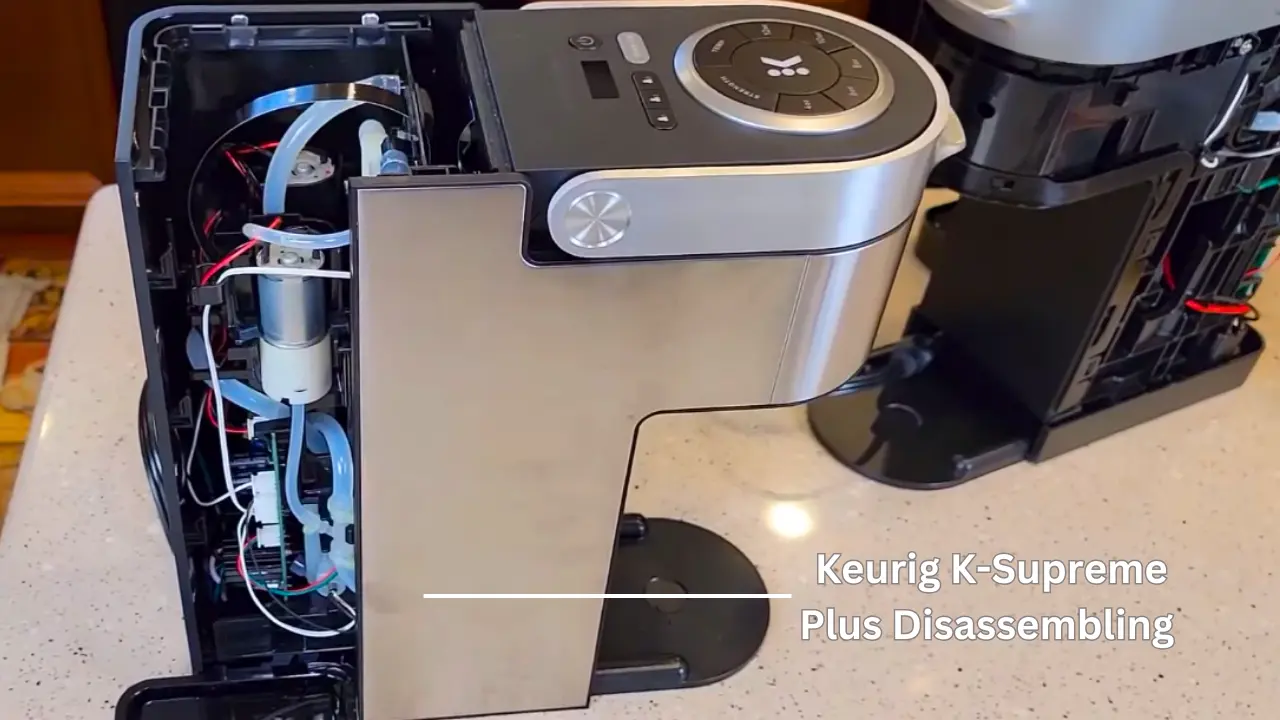
Tools Needed:
- Phillips screwdriver
- T10 Torx screwdriver
- Pry tool
- Spudger
Disassembling Steps:
- Unplug your Keurig K-Supreme Plus.
- Remove the water reservoir and drip tray.
- Locate and remove the screws: Four screws are located at the back of the machine (two under the water reservoir and two near the bottom), and two additional screws are on the sides of the machine near the front.
- Carefully detach the side panels, taking care not to break the clips that secure them.
- Remove the top panel, held in place by two screws, and then lift it off.
- Remove the front panel, which is secured by two screws and two clips.
- Disconnect the electrical connectors: Four connectors need to be detached, two at the front near the brew head, and two at the back (one near the power cord and one near the water line).
- Remove the brew head assembly, which is held in place by two screws.
- Once you’ve reached the inside, you’ll be able to access the thermal fuse, which is typically located on the bottom of the heating element.
- Carefully remove the wires from the old thermal fuse.
- Replace the thermal fuse with a new one that matches the size and rating of the old fuse.
- Reassemble your Keurig K-Supreme Plus by following the steps in reverse order.
How To Reset The Keurig Thermal Switch
To reset the thermal switch, follow these easy steps:
- Look for a small white cap with a hole in the middle and a wire on each side. You’ll find this on the right side of the coffee maker, attached to the spiral heating element.
- Use a simple item like a paper clip, needle, or toothpick.
- Gently push this item into the hole in the center. Don’t worry if you don’t hear a click or any sound; that’s normal.
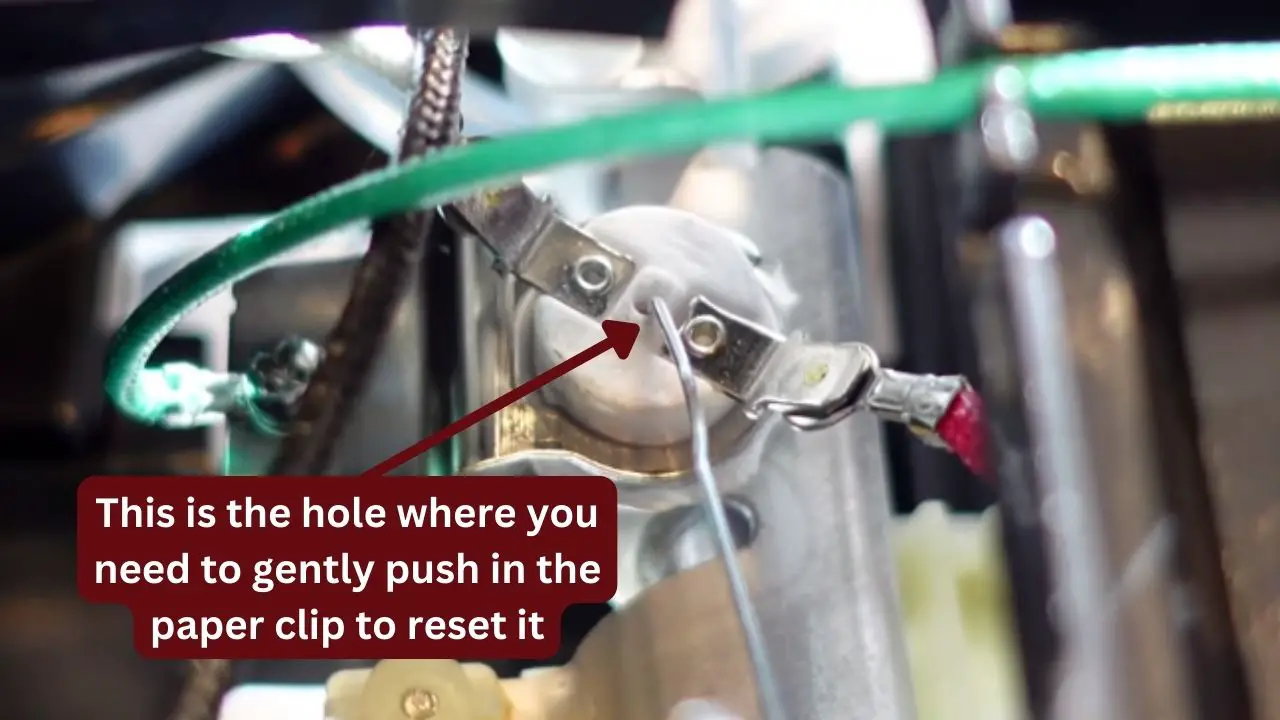
If you’ve pushed it in enough, your coffee maker is now reset, and you should be able to turn it back on.
Keurig Descaling Light Won’t Turn Off After Descaling
If your Keurig’s descaling light persists after a successful descaling process, here’s what might be causing it:
1. Incomplete Descaling Process: The most common reason is that the descaling process was not completed properly. Make sure to follow the instructions in your Keurig manual carefully.
2. Descaling Solution Residue: Sometimes, lingering descaling solution residue can trigger the light to stay on. The solution is to run a few cycles of clean water through your Keurig to clear any remaining residue.
3. Descaling Sensor Issues: On rare occasions, a faulty descale sensor can cause the light to stay on even after a successful descaling. If you suspect the sensor is faulty, contacting Keurig customer support for assistance is your best course of action.
4. Internal Component Failure: In unusual cases, the descaling light may persist due to an internal component failure. If all other potential causes have been eliminated, it might be time to consider professional repair or replacement.
Related: Keurig Lights Flashing – How To Fix
Preventing Keurig Issues After Descaling
To prevent your Keurig from acting up after descaling, consider these simple steps:
- Always adhere to the instructions provided with Keurig’s descaling solution. Avoid using too much or too little, as it can harm your machine.
- Following descaling, ensure a thorough rinse to remove any leftover solution.
- Regular descaling helps prevent mineral buildup, which can lead to overheating or other problems.
- Avoid using harsh chemicals or abrasive cleaners on your Keurig, as they can damage it and void the warranty.
- When your Keurig is not in use, unplug it to protect it from power surges.
- Store your Keurig in a cool, dry place, away from direct sunlight and extreme temperatures.
- Keeping the machine’s needle clean is essential to prevent clogs and ensure your Keurig brews properly.
- Using filtered water can help reduce mineral buildup.
- Always follow Keurig’s descaling instructions carefully. Don’t skip any steps; they’re there for a reason.
- If you have any questions or concerns, reach out to Keurig customer support for expert assistance.
In Conclusion
Now equipped with this comprehensive guide, you’re well-prepared to troubleshoot and maintain your Keurig coffee maker effectively.
As an expert who has invested significant time in compiling this information, I assure you that with proper care and maintenance, your Keurig will continue brewing perfect cups of coffee every day.
And should you encounter any issues, don’t hesitate to reach out to Keurig’s experts for assistance. Here’s to many more enjoyable cups of coffee from your Keurig!
Also Read: