
Last Updated on July 19, 2022 by Timothy Byron Smith
Latte art is the term for designs created in the froth that tops espresso drinks, while many people think that preparing superb espresso is an art form in and of itself.
To create a lovely pattern as latte art, it’s crucial to Make sure your milk is well heated and also your espresso has excellent crema, the fine froth that appears on the surface of an espresso shot.
Know how to make latte art at home! And that, my friends, is entirely possible! After reading and practicing the tips mentioned here, you’ll be able to free-pour frothed milk to create stunning artwork.
Things Needed to Make Latte Art at Home
If you’ve got the right tools, making latte art will be a cakewalk for you!
You Definitely Need an Espresso Machine:
Preferably an automatic espresso machine with a steaming wand. This is because not only do you need to use an espresso machine to make yourself an espresso, but you need to steam the milk as well. And an espresso machine is ideal for achieving both those tasks perfectly!
However, if you don’t have an espresso machine, relax. It’s not the end of the world. There are several ways of making espresso at home without an espresso machine. Plus, you can easily steam or froth your milk without a steam wand too!
What Else is Needed to For Making Latte Art?
Apart from an espresso machine to make a latte, there are only two other things you are going to need.
Milk Pitcher:
You’ll need a metal milk pitcher to get the milk temperature right. Moreover, make sure your milk pitcher has a thin and pointed spout to allow better control when pouring.
A Cup/Mug:
You’ll need a cup or a mug to assemble your espresso and milk into. It must be large enough to hold all the milk and espresso. You don’t want any spillage.
Prepare Milk For Latte Art
The core ingredient for your latte art is obviously milk. And getting it right is absolutely critical for great latte art.
- Using whole milk for your latte art will be the best decision you ever make! Whole milk has a lot of fat which makes for great froth and foam.
- Make sure that the milk you are using is as fresh as it can be. The closer it is to the expiration date the worse it is for your latte art. It won’t foam well if it is old.
- If you wish to go for the dairy-free option then we suggest you try oat milk. While it doesn’t compare to whole milk, however, it is the next best option if you want to go dairy-free.
- If you wish to be eccentric then you may try other flavored kinds of milk as well! However, make sure they froth and foam well.
Started Making Latte Art
Remember, latte art is all about practice and patience. So try to keep yourself cool and your hands steady. Start with something easy and build up to your creativity. We have got some suggestions that you can try.
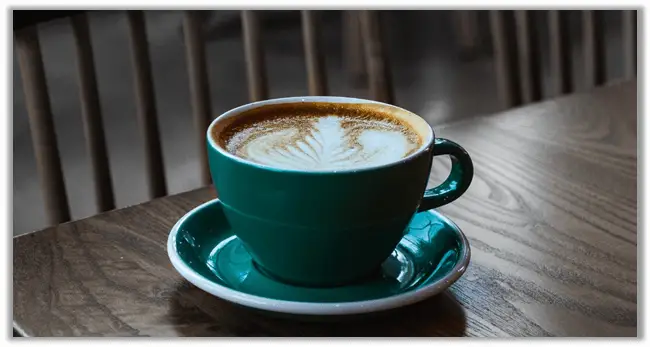
Beginners Latte Art: A lovely heart!

The easiest art for your homemade latte that you can start off with is a heart. You must have seen tons of videos on latte art as well and a heart seems like the easiest to grasp. So, here are the basic steps you need to follow:
- Hold the milk pitcher with the steamed milk in your dominant hand and the cup in the other hand.
- Tilt it towards the pitcher as you pour about eighty percent of the milk into the cup.
- As you are pouring the froth for the art, bring the pitcher closer to the cup’s edge. Shake quickly from left to right to form a circular shape.
- After you have created a sizable round shape, move the pitcher across the round shape and the cup in a straight line to draw the heart.
- Make sure that you keep tilting the cup back as you pour the milk to avoid any spills.
Make it more challenging: A Rabbit
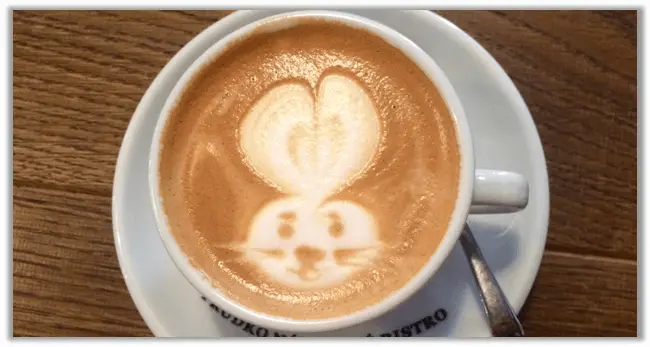
The next latte art you can challenge yourself to is the rabbit. The first few steps are exactly a replication of how you make a heart. Here’s how it goes:
- Hold the pitcher in your dominant hand and the cup in the other hand, tilted towards the pitcher.
- Pour about 80% of the milk into your cup. When the foam starts pouring, shake the pitcher left to right quickly for a round shape.
- Now, instead of drawing a straight line across the round shape, bring the pitcher to the center of the circle. This will create an outline of the rabbit’s face.
- Next, you have to use something pointy to make two eyes and draw outlines for the rabbit’s whiskers!
- Make sure that you keep tilting the cup back as you pour the milk to avoid any spills.
Take it to the Next Level with a Rosetta
To further polish your latte art skills and challenge yourself to more intricate art, try a rosetta.
- Hold up the milk pitcher to an inch above the coffee mug and start pouring the milk to the edge of the cup that is away from you. Pour 50% of the milk into the cup.
- Once you have poured 50% of the milk in, bring the pitcher closer to the cup and start shaking quickly left to right. This creates layers of froth like leaves or branches.
- Keep shaking the pitcher and bring it to the edge of the cup near you.
- Once you have reached the edge and the layers have formed, continue pouring and drag the pitcher to the other end of the cup.
- And your rosetta is ready!
- Make sure that you keep tilting the cup back as you pour the milk to avoid any spills.
Common Mistakes To Avoid When Making Latte Art
If you’re pouring the milk and seeing no art or pattern, you are probably doing something wrong. Here are some common mistakes that people make when making latte art. Try to avoid these and you will not have any problem!
- Using regular milk: A latte art requires properly steamed or frothed milk. If you are adding milk straight out of your fridge then you will not see the results. Plus, you need the right kind of milk that will steam and froth well too! Whole milk is the best option.
- Slow Pouring: Pouring the milk too slowly into the cup is a mistake. Slow pouring will cause milk to separate in the pitcher so the less aerated milk enters the cup forming no art.
- Holding the pitcher too high up: If your pitcher is raised too far away from the surface the milk will not rest on the surface of the espresso to form any art.
FAQs
Conclusion
There is much you can do with just some milk and your espresso if you only tap into your creativity. You do not need anything too fancy or need to be a barista to know how to make latte art at home! It is easy and you just need some practice.
So, there is no room for excuses. Get your tools ready and express your love and creativity through latte art this instant!
