Last Updated on August 30, 2023 by Timothy Byron Smith
Welcome to our concise guide on maximizing your Cuisinart coffee maker’s potential. Whether you have the 12-cup model or the single-serve version, we’ve got you covered with clear instructions on setup and brewing. Plus, we’ll explore the HomeBarista reusable filter cup for those looking to take their coffee customization to the next level.
Let’s dive in and ensure your coffee moments are nothing short of perfection with Cuisinart!
Also Read: How To Set Clock On Cuisinart Coffee Maker
Setting Up the Charcoal Water Filter for Your Cuisinart Coffee Maker
First thing first, a well-brewed cup of coffee starts with quality water, and that’s where the charcoal water filter comes into play with your Cuisinart Coffee Maker. Follow these simple steps to ensure your water is pure and ready to create the perfect coffee experience:
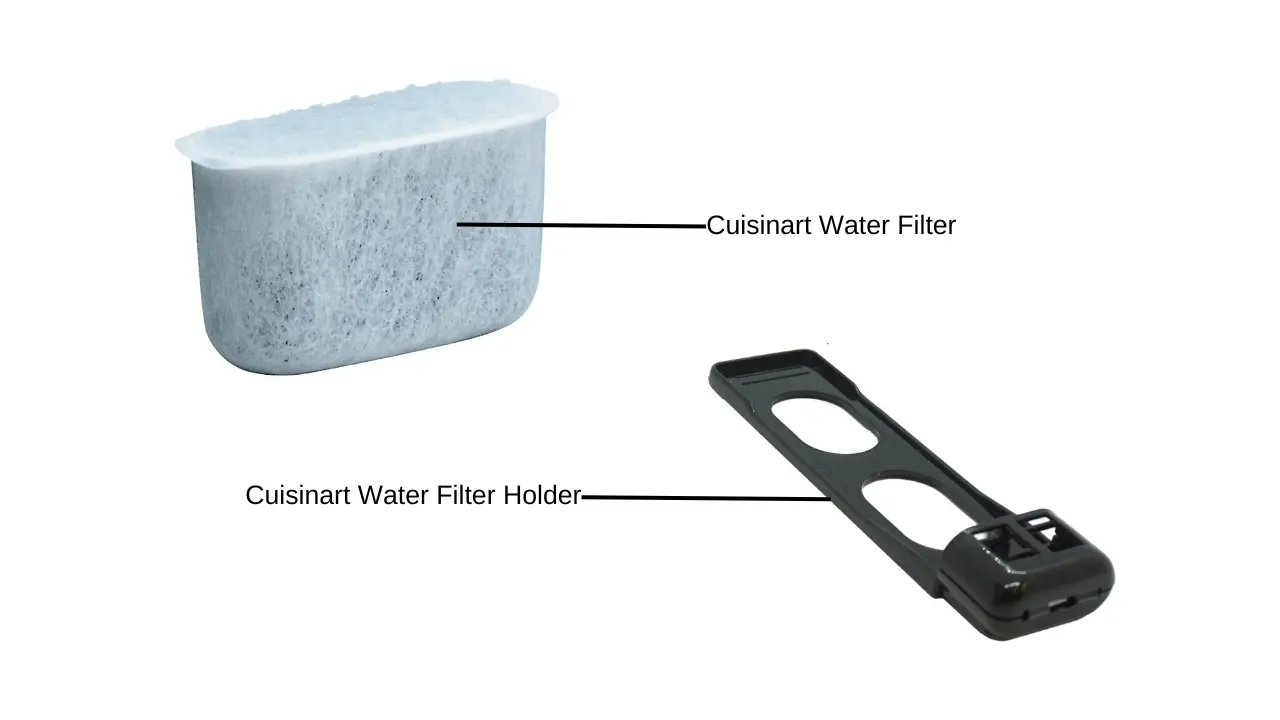
1. Soak the Filter: Start by removing the filter from its polybag and submerging it in cold tap water for 15 minutes. This step helps activate the charcoal, which is essential for removing impurities and enhancing the taste of your coffee.
2. Access the Water Filter Holder: On the 12-Cup Coffee Maker side, lift the water filter holder out of the water reservoir. This is where your filter will be placed to work its magic.
3. Open the Compartment: To access the filter compartment, press down on it and pull it towards you. It should open easily, revealing the space where the filter will be inserted.
4. Place the Filter: Gently place the soaked filter into the holder and snap the compartment closed.
5. Flush the Filter: Now, let’s prepare the filter for action. Run cold tap water through the holes in the bottom of the compartment for about 10 seconds. This step ensures any loose charcoal particles are removed.
6. Let it Drain: Allow the filter to drain completely before moving on to the next step. This ensures that the water you use for brewing is free of any excess moisture from the filter.
7. Reinsert the Holder: Slide the water filter holder back into the channel in the water reservoir, making sure it’s securely seated at the base of the unit.
8. For Single-Serve Users: If you have the single-serve side, don’t forget to repeat the same steps (1-7) to set up the water filter on that side as well.
With your charcoal water filter in place, you’ve taken the first step towards brewing exceptional coffee with your Cuisinart Coffee Maker. This simple but essential setup ensures that your coffee starts with the cleanest and purest water, setting the stage for a delightful coffee experience.
Setting Up Your 12-Cup Cuisinart Coffee Maker (Initial Cleaning)
In this quick guide, we’ll walk you through the essential steps to set up your 12-Cup Cuisinart Coffee Maker, ensuring you’re just moments away from a perfect brew.
1. Insert the Charcoal Water Filter: If you haven’t already, make sure to insert the charcoal water filter following the steps mentioned earlier. This filter will ensure your water is pristine and your coffee is full of flavor.
2. Fill the Water Reservoir: Open the lid and fill the water reservoir with the desired amount of cold, fresh water.
3. Ensure the Carafe is in Place: Double-check that the carafe is securely in its position beneath the coffee maker’s drip spout. This ensures that the brewed coffee goes into the carafe and not elsewhere.
4. Plug It In: Plug the power cord into an independent outlet to ensure stable power supply. Safety first!
5. Turn On the Unit: Locate the power switch on the side of the coffee maker and turn it on. You should see the indicator light illuminate.
6. Set the Function Knob: Turn the function knob to “BREW.” This sets the coffee maker to start the brewing process.
7. Press “BREW”: Now, press the “BREW” button and let the magic begin. Your coffee maker will initiate a one-time cleaning process, which helps ensure the machine is ready for brewing the perfect cup.
8. Discard the Hot Water: Once the cleaning process is complete, the machine will dispense hot water into the carafe. Discard this water carefully. It’s part of the initial setup and ensures your coffee is brewed with clean equipment.
Programming Your 12-Cup Cuisinart Coffee Maker
Unlock the full potential of your 12-Cup Cuisinart Coffee Maker by programming it to suit your coffee needs. Here’s how to set it up in a snap:
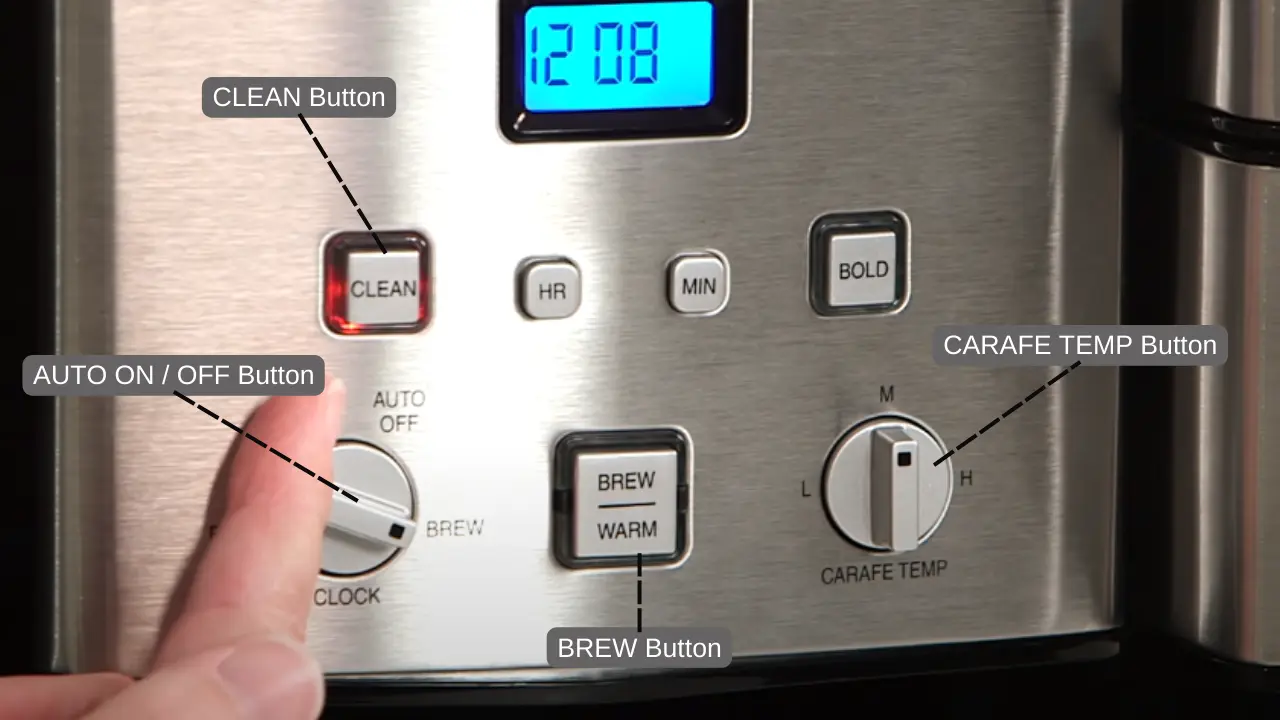
Setting the Clock:
Setting the clock on your 12-Cup Cuisinart Coffee Maker is simple. When you power it on, you’ll see 12:00 flashing. Turn the Function knob to “CLOCK,” use the Hour and Minute buttons to set the time, and for quick changes, hold or press and release the buttons.
Additionally, be sure to keep an eye on the PM indicator if you’re setting the time for the afternoon or evening hours. To complete the clock setting, turn the Function knob to any other setting or wait until the blinking numbers come to a stop. With your clock accurately set, you’re one step closer to enjoying perfectly timed coffee at your convenience.
Setting the Auto-On Time:
In order to set the Auto-On time, follow the following steps:
1. Select Program Mode: Start by turning the Function knob to “PROG.” This mode allows you to set the time when you want your coffee brewing cycle to begin.
2. Program the Start Time: Use the Hour and Minute buttons to input your desired start time for the coffee brewing cycle. This gives you precise control over when your coffee will be ready.
3. Activate the Auto-On Function: Once you’ve set the start time, turn the Function knob to “AUTO ON.” This step activates the program you’ve just set.
4. Confirm Activation: To confirm that the Auto-On function is active, press the “BREW/WARM” button. When it’s activated, you’ll see the AUTO ON blue light illuminate, indicating that your coffee maker is now set to start brewing at the scheduled time.
5. Brew Cycle Initiation: At the designated time, your coffee maker will automatically kick off the brew cycle. During this phase, you’ll notice the BREW light flashing as it prepares your coffee.
6. Keep Warm Mode: After brewing, the WARM light will take over, signifying that your coffee is being kept at an ideal temperature to enjoy when you’re ready.
7. Set for Next Day: If you wish to have your coffee ready at the same time the next day, ensure that the Function knob remains set to AUTO ON. To initiate this schedule, press the Brew/Warm button again.
With these easy steps, your coffee maker becomes a reliable part of your daily routine, ensuring your coffee is brewed precisely when you need it.
Setting the Auto-Off Time:
To take advantage of the Auto-Off feature on your 12-Cup Cuisinart Coffee Maker, start by switching the Function knob to “AUTO OFF.” Once you’ve made this selection, use the Hour and Minute buttons to program the specific automatic shut-off time. You have the flexibility to choose any duration within the range of 0 to 4 hours after your brewing cycle completes.
This convenient feature ensures your coffee maker powers down automatically, giving you peace of mind and energy savings.
Setting the Carafe Temperature:
Adjust the carafe TEMP knob to select your preferred coffee temperature: High, Medium, or Low.
Brewing Coffee with Your 12-Cup Cuisinart Coffee Maker
Elevate your morning routine by brewing delicious coffee with your 12-Cup Cuisinart Coffee Maker. Here’s a quick guide to make your coffee experience a breeze:
1. Insert Charcoal Water Filter:
Ensure your water is pristine by following the above instructions for the preparation and insertion of the charcoal water filter.
2. Fill the Water Reservoir:
Lift the reservoir cover of the coffee maker and pour in the desired amount of water. Use the water level indicator on the side as a guide.
3. Before Brewing:
Make sure the glass carafe is in place on the heater plate, and the top cover is closed securely. Now plug the power cord into an electrical outlet to supply power.
4. Set Preferences:
For a bolder brew, push the “BOLD” button; you’ll see it light up. Now adjust the Carafe Temperature dial to your desired coffee temperature: Low (L), Medium (M), or High (H).
5. Add Ground Coffee:
Begin by lifting the filter basket straight up to remove it from the coffee maker. Depending on your preference, you can insert either a #4 paper filter or a permanent filter.
Now, it’s time to measure your ground coffee. Add one level scoop of ground coffee per cup, adjusting the amount to your taste. Keep in mind that this coffee maker’s maximum capacity for ground coffee is 15 tablespoons or approximately 221 ml.
After you’ve added the coffee, it’s essential to secure everything properly. Replace the filter basket in its holder and press it firmly to ensure it’s securely closed, ready for brewing your delicious cup of coffee.
6. Brewing Coffee:
To initiate the coffee brewing process, start by turning the Function knob to the “BREW” setting on your 12-Cup Cuisinart Coffee Maker. Afterward, press the “BREW/WARM” button, and you’ll observe the blue indicator light flashing slowly, indicating that your coffee is being prepared.
Alternatively, for added convenience and flexibility, you can opt to set the AUTO ON function for delayed brewing, as explained above in this guide. This way, you can wake up to the enticing aroma of freshly brewed coffee or have it ready precisely when you need it without any hassle.
7. After Brewing:
After brewing, be attentive as coffee may continue to flow for a few seconds. Listen for five beeps indicating your coffee is ready to enjoy.
BREW PAUSE™ FEATURE:
The BREW PAUSE™ feature allows you to pour a cup mid-brew, but it could slightly weaken the flavor of the final pot. Please, keep in mind that removing the carafe for more than 20 seconds might result in the filter basket overflowing.
Also Read: How To Clean A Cuisinart Coffee Maker
Setting Up Your Single-Serve Cuisinart Coffee Maker (Initial Cleaning)
Before your first use, it’s essential to perform an initial cleaning. Do this without inserting a coffee capsule.
1. Insert Charcoal Water Filter: Follow the above instructions for inserting the charcoal water filter if you haven’t already.
2. Remove Water Reservoir: Take out the water reservoir from the coffeemaker unit.
3. Fill the Reservoir: At the sink, fill the reservoir with water to your desired level.
4. Reattach the Reservoir: Put the filled reservoir back onto the unit securely.
5. Power On: If you haven’t already, plug the power cord into an independent outlet. Press the power switch located on the side of the unit to turn it on.
6. Open and Close the Brew Head: Open and close the brew head without adding a coffee capsule.
7. Place Mug: Set your coffee mug on the drip tray, ready to catch your freshly brewed coffee.
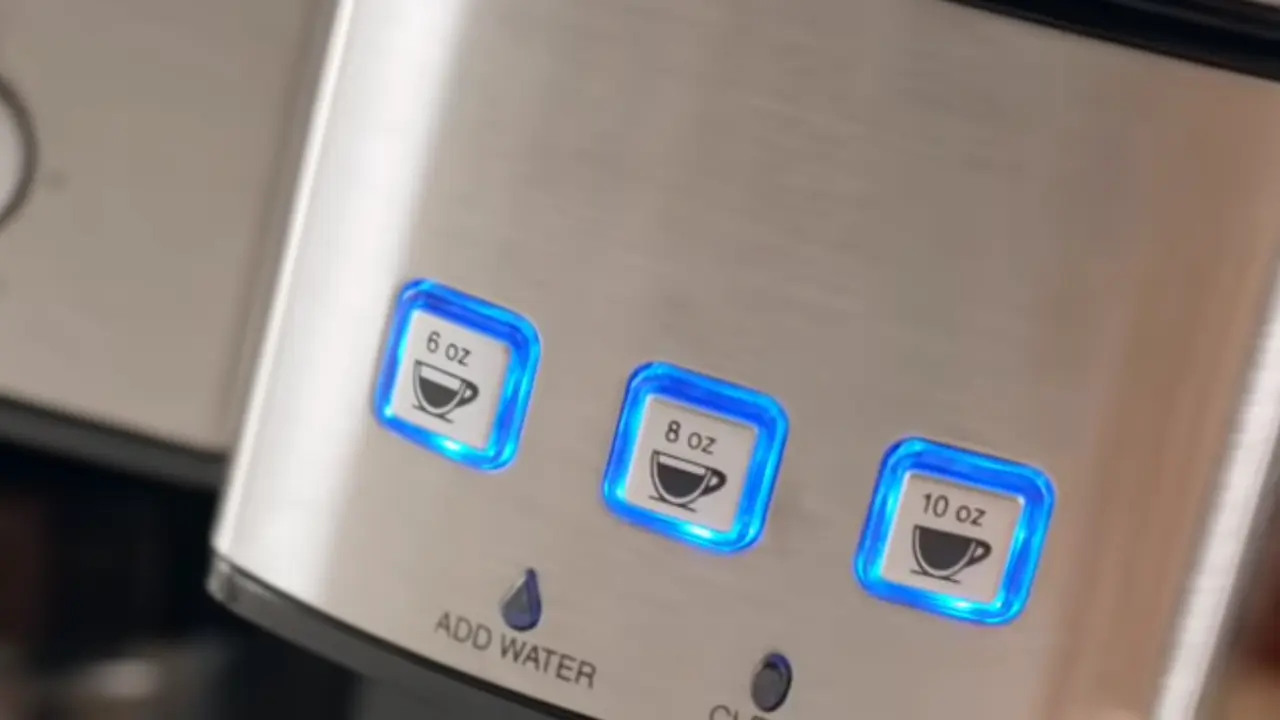
8. Run a Cleaning Cycle: Press the “10 oz. Cup” (295 ml) button. A light will flash slowly, and hot water will start to dispense momentarily.
9. Cleaning Complete: Discard the hot water. Your Single-Serve Cuisinart Coffeemaker is now clean and ready for action.
By following these straightforward steps, you’ve ensured that your single-serve coffeemaker is primed and clean, ready to brew your first delicious cup.
Brewing Coffee with Your Single-Serve Cuisinart Coffee Maker
Get ready for quick and easy coffee with your Single-Serve Cuisinart Coffeemaker. Follow these simple steps to enjoy a freshly brewed cup:
1. Remove Water Reservoir: Take out the water reservoir to fill.
2. Add Water: Fill the 40-ounce (1.1 L) water reservoir with water.
3. Turn On the Unit: If it’s not already on, press the power switch located on the side of your unit. The brew buttons will light up.
4. Prepare Your Mug: Place your coffee mug on the drip tray. For travel mugs, you can remove the drip tray to accommodate them.
5. Select a Capsule: Choose your favorite coffee capsule but do not remove the foil lid or puncture the capsule.
6. Load the Capsule: Open the brew head and place your chosen capsule in the brewing chamber. Close the brew head.
Caution: The brewing chamber has two sharp needles that puncture the capsule (one above and one below). Avoid putting your fingers in there to prevent injury.
7. Start Brewing: Press your desired brew button [6, 8, or 10 oz. (170 ml, 235 ml, or 295 ml)]. Your coffee will begin dispensing. The selected brew button will flash slowly during brewing. To stop brewing, press the selected brew size again.
8. Remove and Dispose of Used Capsule: Once brewing is complete, all lights will illuminate. Lift the handle, carefully take out and discard the used capsule (it will be hot), and then close the brew head.
Add Water
The “Add Water” light will turn on when the water level is below 10.5 ounces (310 ml). Simply refill the reservoir with water when this light comes on, and your unit will be ready to brew again.
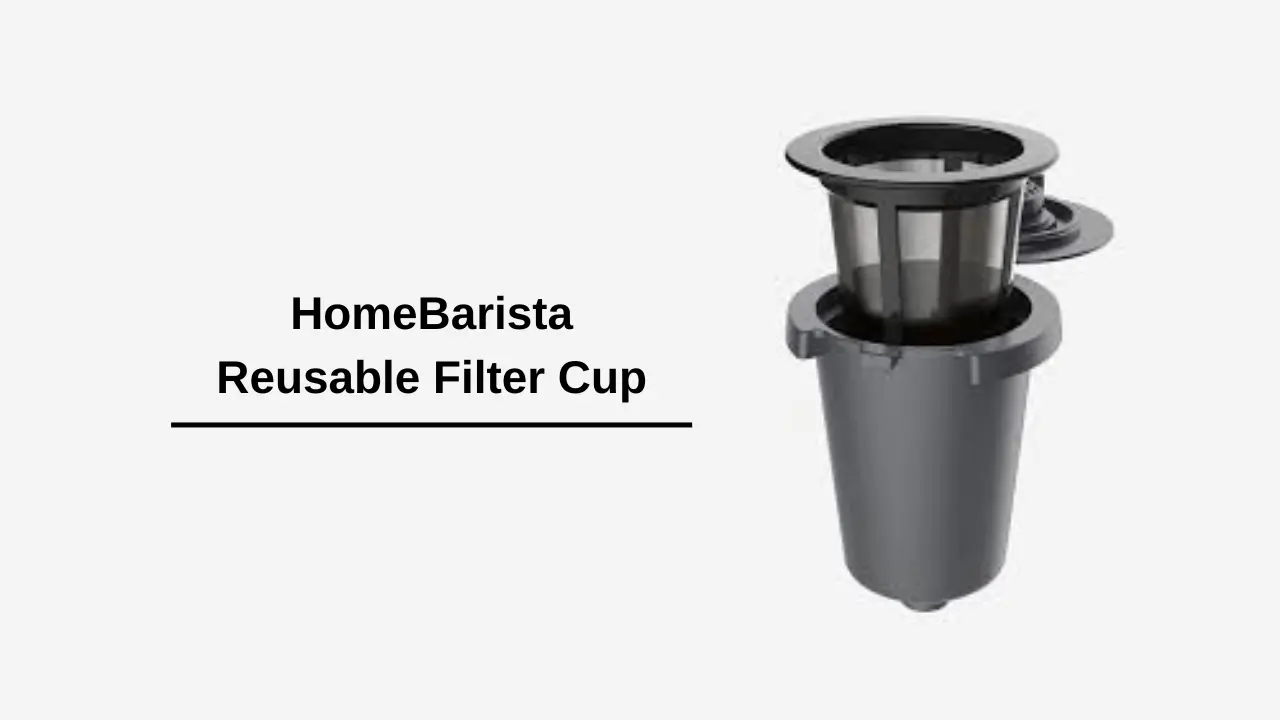
Brewing with the HomeBarista™ Reusable Filter Cup
Elevate your coffee experience with the HomeBarista™ Reusable Filter Cup in your Single-Serve Coffee Maker. Here’s how to brew your favorite coffee or tea using this eco-friendly option:
1. Prepare Ground Coffee:
- Fill the filter basket within the reusable capsule with ground coffee. Make sure not to exceed the max indicator level.
- Adjust the amount of coffee to your liking, but avoid tamping down the grounds.
- Ensure there are no coffee grounds on the upper rim of the filter basket.
- Remember, the maximum fill is 2.5 scoops or 15 grams.
2. Prepare the Reusable Capsule:
- Remove the capsule holder from the brewing chamber by pulling it towards you.
- Simply drop the reusable coffee capsule into the brewing chamber; there’s no need to snap it into place.
- Follow the brewing instructions mentioned earlier (from page 11).
- To stop brewing, press the selected brew size once again.
3. After Brewing:
Once the brewing process is complete, lift the handle and carefully remove the reusable coffee capsule. It will be hot.
4. Replace the Capsule Holder:
- Make sure the arrow on the capsule rim aligns with the arrow on the brewing chamber.
- Gently push the capsule holder back into place until it snaps securely.
This is it! You now have all the information that you need to start using Cuisinart coffee maker on a regular basis. If you still have any questions, feel free to reach out to us.
